

I just pulled a batch of cookies from the oven, and they’re already disappearing. These Peanut Butter Cup Cookies are the perfect mix of chewy and melty-gooey, with chocolate peanut butter cups pressed right in the middle.
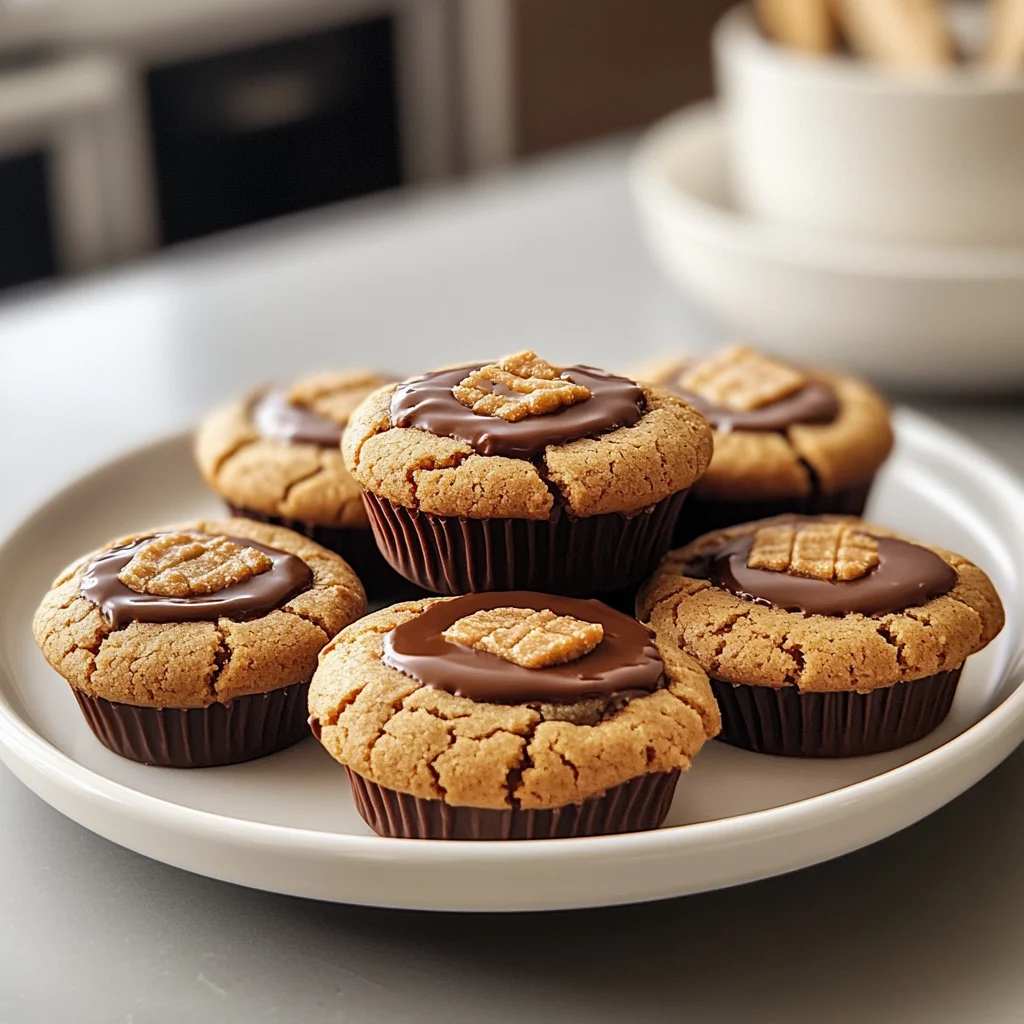
They’re great for nights when you’re craving something sweet but don’t want to spend hours in the kitchen. Plus, you only need one bowl to whip them up (trust me, cleanup is a breeze). Seriously, these cookies are about to be your new go-to. Just bake and enjoy!
Why You’ll Love This Peanut Butter Cup Cookies
- Super Easy Prep: Just mix a few ingredients together and scoop them onto a baking sheet. Seriously, anyone can do it.
- Melty-Gooey Goodness: That moment when the chocolate peanut butter cup melts into the warm cookie? Absolute magic (trust me on this).
- Sweet-Savory Balance: The rich peanut butter pairs perfectly with the chocolate, making each bite a sticky-sweet explosion of flavor.
- Flexible Treat: You can swap in different kinds of mini candies if you’re feeling adventurous. Just don’t try using low-fat peanut butter — it won’t work out.
- Perfect for Sharing: It’s easy to make a big batch for parties or bake sales, but be warned — they disappear fast!
Peanut Butter Cup Cookies Ingredients
For the Base:
peanut butter (1 cup) — Use creamy Jif; chunky will mess with the cookie’s texture.
granulated sugar (1 cup) — Don’t skimp on sugar or your cookies will be bland and flat.
egg (1 large) — Always use a large egg; medium won’t bind the dough properly.
vanilla extract (1 teaspoon) — Go for pure vanilla extract, not imitation, or flavor’s gonna fall flat.
baking soda (1/2 teaspoon) — Don’t skip the baking soda; without it, your cookies won’t rise.
For the Topping:
chocolate peanut butter cups (24 mini chocolate peanut butter cups) — Stick with Reese’s; other brands just don’t melt right in the cookies.
Full measurements in the recipe card below.
How to Make Peanut Butter Cup Cookies
1. Preheat Oven: Preheat the oven to 350°F (175°C) and line a baking sheet with parchment paper. You want it ready for those cookies when they’re mixed.
2. Mix Ingredients: In a large mixing bowl, combine the peanut butter, granulated sugar, egg, vanilla extract, and baking soda. Mix until smooth and creamy (it should look like thick frosting).
3. Scoop Dough: Scoop tablespoon-sized amounts of the dough onto your prepared baking sheet, spacing them about 2 inches apart. It’ll help them bake evenly without merging into one big cookie.
4. Bake Cookies: Bake in the preheated oven for 8-10 minutes or until the edges are lightly golden. Watch out here — don’t walk away! They can go from golden to burnt in about 30 seconds.
5. Add Toppings: Remove the cookies from the oven and immediately press a mini chocolate peanut butter cup into the center of each cookie while they’re still warm and soft.
6. Cool on Rack: Allow them to cool on the baking sheet for 5 minutes before transferring them to a wire rack to cool completely. You’ll want them nice and set before digging in!
7. Enjoy!: Once cooled, these Peanut Butter Cup Cookies are ready to devour! Don’t be surprised if they disappear fast.
Exact quantities in the recipe card below.
How to Store Peanut Butter Cup Cookies
- Room Temperature: Keep them in an airtight container for up to 3 days. (They’ll be chewy and delicious, but the chocolate might lose a bit of its melty-gooey vibe.)
- Refrigerator: Use a sealed container for up to a week. (Just know that the cookies can get a little firmer and lose some of that fresh-baked warmth.)
- Freezer: Wrap individual cookies in plastic wrap or foil, then pop them in a freezer bag for up to 3 months. (They’ll still taste great, but the texture can change slightly after thawing.)
- Reheating: Pop them in the oven at 350°F for about 5 minutes. You’ll know they’re ready when they smell like heaven again and the chocolate starts to soften!
What to Serve with Peanut Butter Cup Cookies?
These cookies are super sweet and rich, so having something a bit tart or light on the side helps balance things out. Here are some pairings I think you’ll love:
- Vanilla Ice Cream: The cold creaminess contrasts perfectly with warm cookies, making each bite feel lighter.
- Fresh Berries: Their tartness cuts through the sweetness and adds a pop of color to your plate.
- Chocolate Milk: A classic! The cold temperature cools down the sweetness while keeping that chocolate vibe strong.
- Coffee: A warm cup brings out the cookie’s flavors without adding more sweetness—perfect for dunking!
- Coconut Yogurt: Its creamy texture adds a refreshing note; just spoon some on the side for a fun dip.
- Fruit Salad: Try mixing up seasonal fruits like citrus or berries (it takes just 10 minutes to prep). The acidity balances everything beautifully!
- Chia Seed Pudding: Make this ahead of time (it only needs 4 hours in the fridge) for a creamy, nutty companion that’s not too sweet.
I’d skip heavy desserts with these cookies; they don’t need any competition!
Peanut Butter Cup Cookies Variations
Here’s how to play with this recipe and switch things up a bit!
- Nutty Crunch: Add 1/2 cup chopped peanuts to the dough for extra texture and flavor (mix in with the other ingredients).
- Chocolate Drizzle: Melt 1/2 cup chocolate chips and drizzle over cooled cookies for a sweet finish (do this after they’ve cooled completely).
- Salted Caramel Twist: Press a mini chocolate peanut butter cup into the cookie, then drizzle with caramel sauce before cooling (add it right after baking).
- Cocoa Kick: Replace 2 tablespoons of granulated sugar with unsweetened cocoa powder in the base for a rich chocolatey taste (mix it in at the start).
- Peanut Butter Swirl: Use crunchy peanut butter instead of smooth for added texture and flavor (sub it directly in the recipe).
- Next Level Stuffing: Before pressing in the peanut butter cups, stuff each dough ball with 1/2 teaspoon of Nutella for melty goodness inside (add before baking!).
- Mini Cookie Bites: Scoop out smaller dough balls (about 1/2 tablespoon) for bite-sized cookies, reducing bake time to about 6-8 minutes.
Make Ahead Options for Peanut Butter Cup Cookies
I love to prep my Peanut Butter Cup Cookies ahead of time. You can mix up the dough and store it in an airtight container in the fridge for up to three days. Just scoop out your cookie dough onto a baking sheet and freeze them for a couple of hours before popping them into a freezer bag if you want to go longer (like, a month or so). Right before serving, bake them fresh—don’t forget to add those chocolate peanut butter cups right after they come out of the oven! The cookies hold their shape well, but they can get a little soft if left out too long. Bake ‘em fresh for the best results!
Peanut Butter Cup Cookies Recipe FAQs
Can I make Peanut Butter Cup Cookies ahead of time?
Totally! You can mix the dough a day in advance and store it in the fridge. Just make sure to cover it tightly so it doesn’t dry out. When you’re ready to bake, scoop and bake as usual. If you want to prep even further, you can freeze the scooped dough balls on a baking sheet, then transfer them to a freezer bag for up to 3 months. Just add an extra minute or two to the baking time when you use frozen dough!
Why did my Peanut Butter Cup Cookies come out flat?
If your cookies turned out flat, it could be a couple of things. First off, did you measure your sugar properly? Skimping on sugar will definitely flatten them out. Also, don’t forget that baking soda — if you missed that step, they won’t rise as they should. Look for lightly golden edges when they’re done; that’s your cue they’re ready!
What can I substitute for granulated sugar in this recipe?
I wouldn’t recommend swapping granulated sugar for anything else here. It really plays a key role in texture and flavor. Brown sugar might work, but it’ll give your cookies a different taste and texture (they’ll be chewier). If you’re looking to reduce sugar, just remember: less means flatter and less sweet cookies! So keep it classic if you want those sticky-sweet vibes.
How do I know when my cookies are done baking?
You’ll want those edges to be lightly golden — that’s when they’re ready! The center might look a bit soft; don’t worry, they’ll firm up while cooling (trust me on this). If they start browning too much all over or smell burnt, it’s time to take them out. Keep an eye on ‘em because they can turn from perfect to overdone super quickly!
Final Thoughts on Peanut Butter Cup Cookies
These Peanut Butter Cup Cookies are worth making just for how quickly they come together. Seriously, you can whip up the dough in no time, bake them, and have that melty-gooey chocolate peanut butter cup right in the center. If you’ve been putting this off, tonight’s the night. Trust me—once you taste that sticky-sweet combo of peanut butter and chocolate, you’ll want to make these again and again. Drop a comment if you added anything — I’m always curious!
Peanut Butter Cup Cookies
Ingredients
Method
- Preheat the oven to 350°F (175°C) and line a baking sheet with parchment paper.
- In a large mixing bowl, combine the peanut butter, granulated sugar, egg, vanilla extract, and baking soda. Mix until smooth.
- Scoop tablespoon-sized amounts of the cookie dough onto the prepared baking sheet, spacing them about 2 inches apart.
- Bake in the preheated oven for 8-10 minutes, or until the edges are lightly golden.
- Remove the cookies from the oven and immediately press a mini chocolate peanut butter cup into the center of each cookie.
- Allow the cookies to cool on the baking sheet for 5 minutes before transferring them to a wire rack to cool completely.